You can convert a photo to SVG by tracing its pixels into colored vector regions. The output scales as paths, but it will not preserve every photographic detail. This approach is useful when you want poster-like artwork or a simplified illustration. If you need the photo to look unchanged, keep a raster format instead of treating SVG as a lossless upgrade.
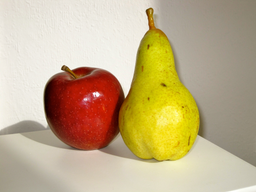
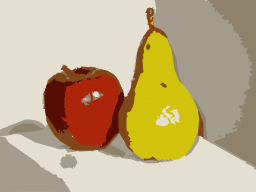
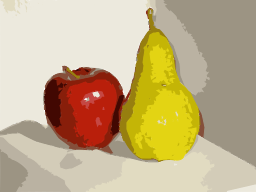
Photo: Apple and pear by Yves Geissbühler, CC0. Resized to 256 × 192 before tracing.

1. Our real-photo example
The example shows an apple and a pear photographed by Yves Geissbuhler and published on Wikimedia Commons under CC0. We resized a copy to 256 by 192 pixels before tracing it with ImageTracerJS at four, sixteen, and thirty-two colors. The original subject, source credit, reference settings, SVG outputs, and raster previews are provided so the comparison can be inspected rather than accepted as a marketing claim.
The photograph contains smooth lighting, small surface spots, reflected highlights, and a textured wall. These are useful stress cases because they do not have the clean boundaries found in a flat logo. The reference trace turns tonal changes into shape boundaries. Compare the highlight on the apple, the pear's silhouette, and the cast shadow: keeping the subject recognizable is different from keeping the photograph visually identical.
2. What changes during vectorization
A camera image describes many pixels with subtly different colors. A tracer groups related pixels and constructs contours around their regions. Continuous shading becomes a finite set of shapes. Tiny spots may disappear, combine, or become separate islands. The paths are genuine vector geometry, but their existence alone does not mean the converter recovered a hidden original drawing from the photograph.
The three reference runs contain seventy-four, one hundred and eight, and two hundred and one paths respectively. Those counts describe this particular resized image and recorded setup. They are not a general complexity forecast for every photo. More regions can retain additional tonal structure while still changing fine detail; fewer regions can create a deliberate posterized effect. Decide which outcome serves the design before tuning settings.
3. Choose a photo that has a clear subject
An object with a recognizable silhouette and a quiet background is a more manageable starting point than a crowded scene. Crop away irrelevant surroundings before conversion, but keep enough room around the subject to preserve its contour. If the source includes several overlapping objects, decide whether you want them as one composition or as separately editable shapes; automatic tracing does not reliably infer your intended layers.
For portraits, small changes around eyes, lips, and hair can alter expression even when the overall color distribution looks plausible. Review those details closely and avoid promising photographic likeness from a simple palette setting. A low-detail silhouette can work well for a decorative badge; it is a poor substitute when identity or exact product appearance matters. Keep the untouched photograph as the authoritative reference.
4. A practical browser workflow
Open Image to SVG, select a browser-readable photo such as JPG, PNG, or WebP, and begin in Color mode. Try a modest palette first, then add colors only when an important region is missing. Change detail separately so you can see its effect. Use Grayscale when tonal structure matters more than hue, or Black & White when the desired output is a strong silhouette rather than a color illustration.
Download a promising SVG and compare it at the final display size. A complex result can look impressive when enlarged yet appear muddy as a small graphic. If the photo has a busy background, prepare a cleaner source rather than expecting extra colors to identify the subject automatically. Processing in SVGConv happens locally; the photo is not sent to a conversion server for tracing.
5. SVG does not always save space
A traced photograph can require many paths and long coordinate sequences. That may make it larger or harder to render than a compressed JPG or WebP. Our sample report records bytes for the specific PNG input and SVG outputs, but it is not a fair comparison against every optimized photo format. Compare the actual files you plan to publish, including any compression your website applies.
Embedding a JPEG inside an SVG is another way to create an SVG file, but it leaves the picture raster-based. That is not the path-based vectorization shown here, and zooming beyond the image's useful resolution still reveals pixels. When evaluating another converter, inspect its download rather than judging the extension. A file containing a single image element may be a container, not editable traced artwork.
6. When to stop tracing
Keep the vectorized version when simplification is the goal: a poster illustration, a limited-palette graphic, or artwork you plan to recolor manually. Keep the raster photograph for product inspection, detailed documentation, and ordinary photo galleries. For a clean cutout outline, manual silhouette work may be more useful than thousands of colored regions. The best format is the one that preserves what the viewer needs.
If repeated adjustments still damage key details, do not treat that as a reason to maximize every control. Switch methods or retain the photo. The example above demonstrates both the possibility and the limitation: real SVG paths can describe recognizable photographic subjects, but tracing changes the image. A successful photo-to-SVG conversion is an intentional illustration choice, not a promise of lossless photographic conversion.
Reference Test Files
These measured byte counts and path counts describe the linked reference files, not visual scores or a benchmark of competing services.
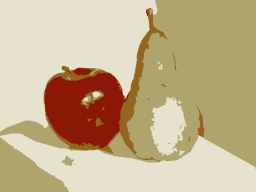
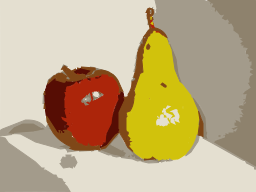
Download the recorded settings and results. The sample files can be regenerated with the repository's example-generation script.
Try the Appropriate Workflow
Start with PNG to SVG, JPG to SVG, or Image to SVG. For supported text and a known font, use Text to SVG instead of tracing tiny letters.
Source and Further Reading
The tracing engine is ImageTracerJS. For manual bitmap-tracing workflows, consult the official Inkscape tracing tutorial. Our examples are local test results, not tests of Inkscape or an AI service.